An Introduction to the Visual LISP IDE
The Visual LISP IDE (rather, more precisely: Visual LISP Integrated Development Environment (VLIDE) - but that's a bit of a mouthful), is an excellent developer tool & resource supplied as standard with the majority of full versions of AutoCAD.
Even if you are just starting to program in LISP, in my opinion, the VLIDE is essential and can be a great learning aid.
This tutorial will demonstrate how to get started with the VLIDE, and, to keep things relatively clear, I won't be delving too deeply into the multitude of tools available to the developer.
Introduction
To begin, open AutoCAD to a blank drawing and type VLIDE at the command line.
A window should appear, containing two or more smaller windows including the Console Window & Trace Window (more on these later).
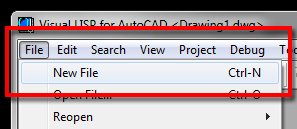
Let's begin by opening a New File in which we can start to construct a program. To do this, go to File » New File (alternatively using the shortcut: Ctrl+N).
In the window that appears, we can start to construct our LISP program. As an example, copy or type the following code into the blank editor window:
(defun c:test ( )

  (princ "\nI can now use the VLIDE.")
  (princ)
)
You will notice that the functions, brackets, strings and other items are highlighted accordingly:

The syntax highlighting is a great visual aid, and also helps prevent protected symbols such as function names being used as names for variables, as they are highlighted accordingly.
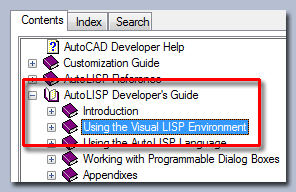
At this point, we can study the code in more detail, and, if not sure about how a function is to be used, we can immediately get information about that function using the VLIDE Help Documentation. A tutorial on how to do this can be found here.
Also, we can open an existing LISP file to edit the contents in the VLIDE Editor Window - to do this, either go to File » Open File or use the shortcut Ctrl+O.
Loading a Program
OK, so we've just constructed a program in the Visual LISP IDE, now to test it out!
As you may know, loading a program into AutoCAD can sometimes be tedious, as the LISP file needs to be saved, then either loaded using the Appload command, or maybe the ACADDOC.lsp. But, you'll be pleased to know, loading programs in the VLIDE is much simpler.
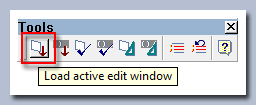
There are three equivalent ways to load a program: by going to Tools » Load Text in Editor; by clicking on the relevant toolbar icon on the Tools toolbar; or simply by using the shortcut Ctrl+Alt+E.
Upon loading the program, the Visual LISP Console window will appear indicating whether the code has been loaded successfully.
Now, having loaded the example code above, we can go back to the AutoCAD window, and at the command line type: test to start the program.
The Visual LISP Console
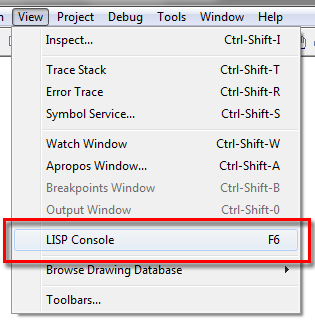
The Console Window can be activated by going to View » LISP Console or using the shortcut F6.
The Console will immediately evaluate an entered LISP expression, whether it be a call to a function, the function itself, or maybe a variable. This is handy for experimenting with functions & expressions without having to create an entire program.
A Few Examples
Evaluating a LISP Expression
_$ (+ 2 2)
4
Variable Evaluation
_$ (setq var 1.4142)
1.4142
_$ var
1.4142
Protected Symbol Evaluation
_$ actrue
1
_$ defun
#<SUBR @0fbfaaf0 DEFUN>
Calling a Function (using the example code from earlier)
_$ (c:test)

I can now use the VLIDE.
Further Information
This tutorial has covered the basics of the Visual LISP Integrated Development Environment (VLIDE) - the Editor offers many essential debugging tools to get you out of a fix when code goes wrong, and furthermore other tools to format code at the touch of a button. Be sure to explore the VLIDE Help Documentation detailing how to get the most out of the VLIDE.